There was a time when our electronic components all had wire leads to connect them. Binding posts, lugs, and tube sockets were built to wrap those wires where we could solder them. Soldering irons were the size of bananas, sometimes larger. Before we get too nostalgic it might be best to step back and remember how big, heavy, and expensive this equipment was.
Surface Mount Devices (SMD), sometimes called Surface Mount Technology (SMT) components are more compact, sturdier, and cheaper. They are the reason that our electronic equipment is smaller, cheaper, and lighter. Overall, SMD components are easier to use. Parts are usually more orderly placed over the surface of the board, easily accessed. With mass production and less material SMT is much less expensive. The new parts don’t take up any storage space, either.
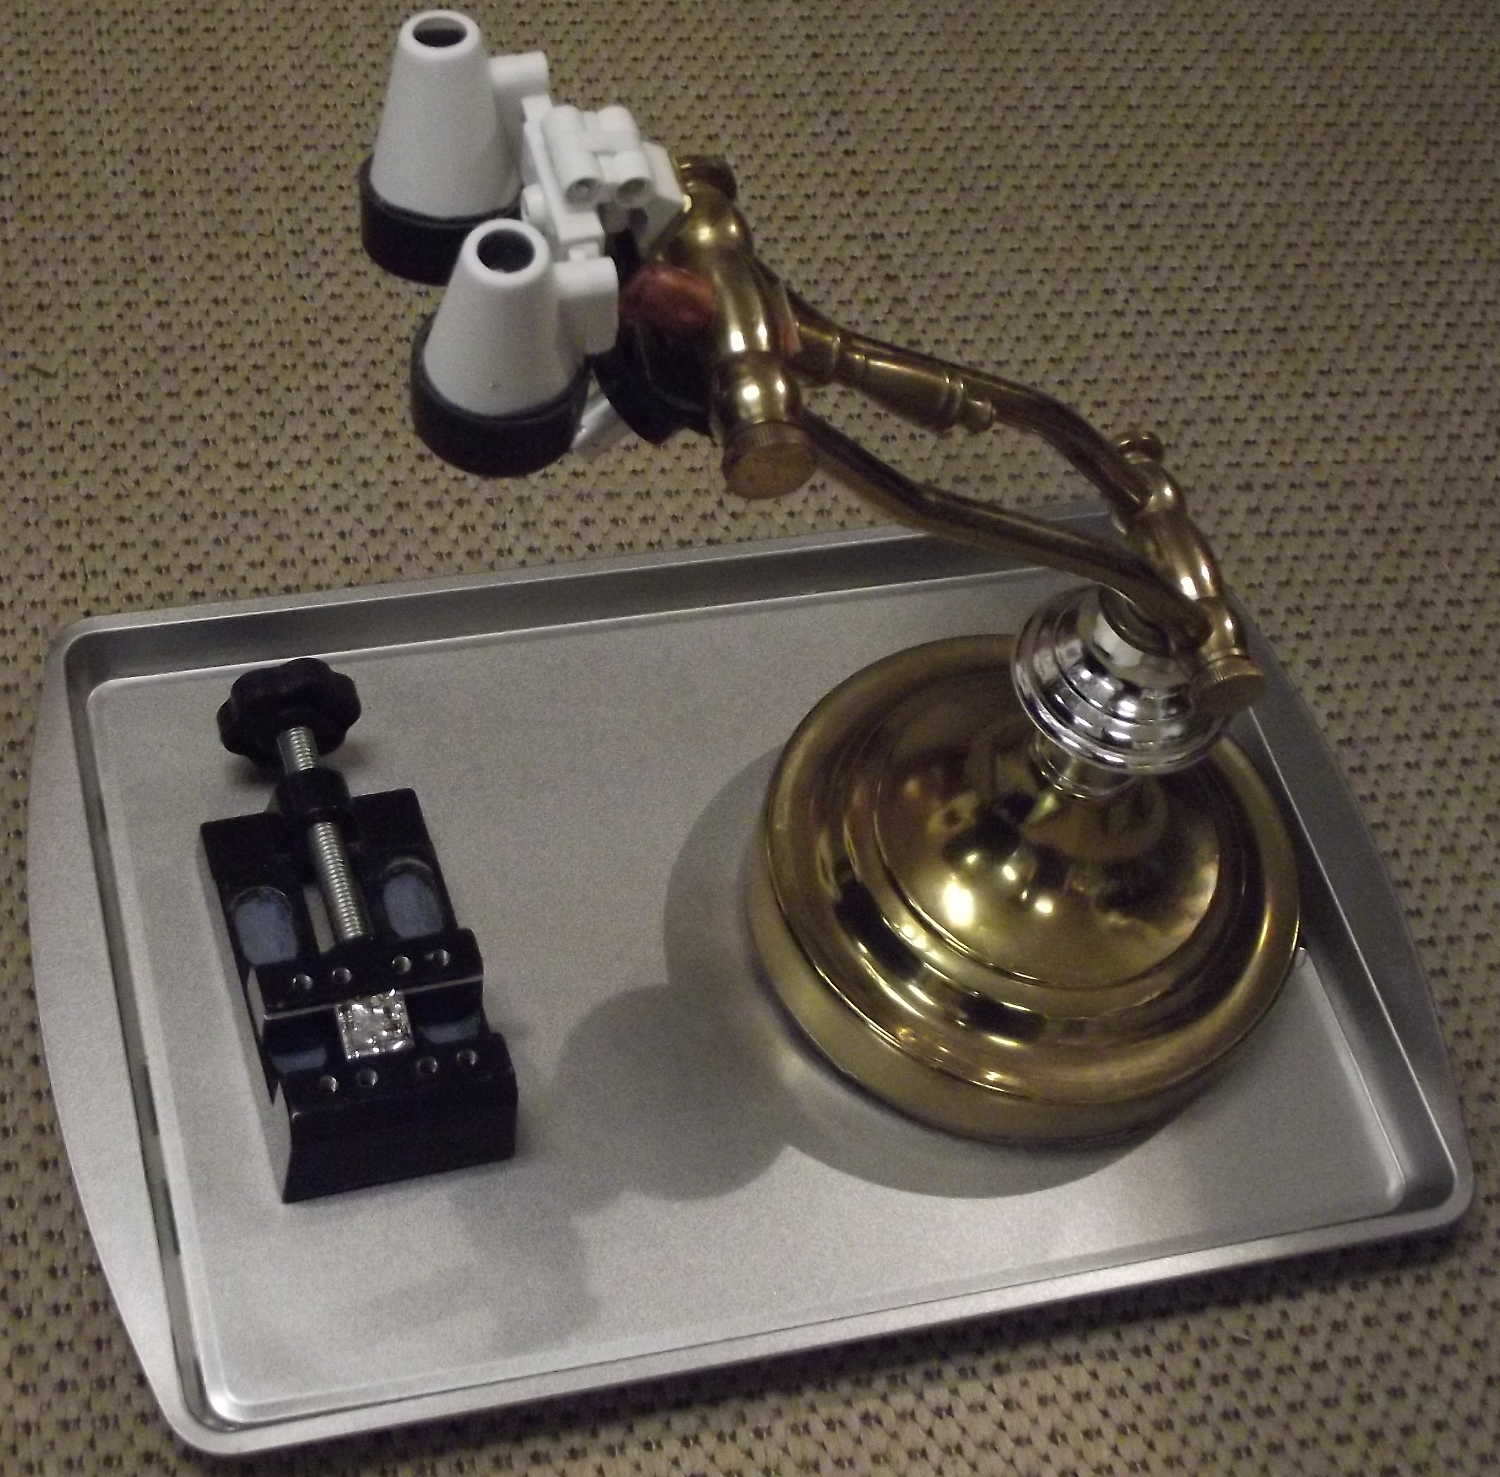
First I need to see what I am doing. There are many options available and often several devices are used on the bench for a project. My first choice is K9AC ‘s SolderScope ( QRP Quarterly April 2018, www.qsl.net/k9ac/solderScope ). I built mine using an old brass piano lamp base. The added lenses I attached using a couple of plastic 35mm film cans. For the last few years I have depended on this gadget for all jobs on the bench, not just SMT.
For several years I have enjoyed using the “student-grade” dental loupes. They sell for around $30 (USD) and have excellent optics. Unlike the visor-mounted magnifiers, I don’t have to have my nose right in my work. Instead, I sit in a comfortable position about 20” away from the soldering tip. The magnified view is about 2”, quite adequate, and I can glance aside to pick up another tool or read a schematic without having to move or adjust the loupes. The view is stereoscopic so I have full depth perception and retain the natural view and feel of my work environment. Unlike the visor-mounted magnifiers, these loupes are light weight and comfortable. I can see why surgeons and dental technicians love them. The SolderScope expands on this capability (although in a more fixed mode) by using the additional optics to increase the magnification while keeping the same field of view. Working distance is reduced to about 10” but leaves ample working room.
For really small stuff I use a stereo microscope that gives me 10X or 20X magnification (Amscope model SE400-z). This takes up more room on the bench but the articulated boom can be folded back out of the way when not in use. Unlike my previous stereo microscope, this has a generous 8" working distance. The big microscope is a good tool for critical inspections. Things like cold joints, stray solder balls, and tiny wire fragments become easily visible. It is one of the luxuries that I awarded myself at the beginning of the pandemic. In all honesty, I still use the SolderScope for nearly all of my work. Price isn't the issue, it is ease of use and effectiveness!
I notice that many builders are using digital microscopes for building and inspecting. I find them to be useful for taking photos for documentation but entirely unsuited for building. The latency (the delay between real-world action and the time that it appears on the screen) is distracting. That time lag makes positioning and soldering quite nerve wracking. If you shake like I do then you will truly appreciate the difference. Viewing it in real, immediate, time allows me to work as if I were working on big old chassis equipment. Not having the stereoscopic view that I have with my optical microscopes is even more dramatic. It helps to have depth perception! Looking at a digital display is like seeing with only one eye.
Although heavy, the newer visor-mounted magnifiers are fairly comfortable. They are often quite inexpensive (around $15) and have the options of easily changing magnification. I have some that I use occasionally and for the price they are good to have. The main disadvantage is the necessity of placing your face quite near the work. The head band is restrictive and you need to relocate the lenses in order to read schematics and such. Still, they often prove useful and I keep a pair available. The more options you have, the better.
For more than 40 years I have used the large single magnifier lens with the surrounding lamp on a swing-arm. It works well for many things but lacks the magnification for truly small work. Also I keep several of the jeweler’s loupes that fit in my eye socket. These are fine for a quick look at something quite small and they leave both hands free. I take one back-packing for when I need to remove a sliver or do a fine repair in the field. They are plastic and can often be found for under $1. Good for reading the small print on a resistor or transistor but not enough working distance for soldering!
Good lighting is essential to good workmanship. Fine work, especially if magnification is employed, requires bright light. A swing arm light is often a good choice and a goose-neck desk lamp works nicely in some situations. Bright LED flood lamps fit both styles and is highly recommended. They are light weight and generate less heat.
The heavier light “bulb” requires good friction controls on the swing arm lights and hefty weighted bases on the goose neck fixtures. On the work bench where I use a goose neck, I mounted powerful magnets (saved from an old computer hard drive) in the base so that it clamps securely to a steel bread pan. Read more about these pans below.A good soldering iron is key. One with temperature control of some sort will keep it tamed. I mostly use the Weller WTCP series irons. They have magnetically controlled temperature that is defined by the selected tip. 40 to 60 watt units are adequate and various tips are used for specialized work. My favorite tip is the model PTA6 which is a 600 degree F. iron-plated “screwdriver” tip. They last for years with proper maintenance.
I sometimes use an electronically controlled rework station (the Kendal 852D++ shown to the right) that has a small iron with long tips for difficult locations and a hot-air facility. This is a good tool for working with ICs and for removing components but not used much for construction projects. The iron has poor temperature control, allowing the tip to cool quickly when beginning to solder and slow recovery. The temperature sensing is evidently not in the tip. The tips have low thermal mass, unlike the Weller, and has poor quality plating so does not endure much work.
That rework station uses an air pump mounted in the main cabinet and a large diameter hose to the hot air handle. One more thing sweeping across the work bench. Rather large, too. Annoying!
When I established another, smaller, lab I purchased one of those generic "858D" hot air stations. No soldering iron, just the small control box and a single small diameter cord to the hot air handle. The air pump and the heating element are in the handle and there is a magnetic switch that puts it to sleep when you replace it in its holder. Since it is separate from the Weller iron that I use, I can place it where I wish and avoid bench clutter. Three sizes of nozzle are included and I keep the two not in use on top of the control unit, held by two disk magnets. Excellent for SMD work and for installing heat shrink tubing and such. My wife bought one to use with her crafts. After four years of use, we have had no problems. I highly recommend it.
Soldering aid tools are a must. For $5 or $6 you can buy an assortment pack. These have insulated handles and black oxide coated metal ends for holding down SMD parts for soldering, prying loose components, pulling wires, and cleaning solder from holes. There are usually two metal ends on each handle. The molten solder does not stick to the tool and the small thermal footprint does not drain the heat from the work excessively like pliers would. These allow the tech to avoid prying with the tip of the iron (ouch!) or with a screwdriver or knife. Just a light pressure on the center of an SMD resistor using the small angled flat tip holds it in place during soldering. A curved tip on the other end holds a rounded diode in place. Having the proper tool really helps.
Component handling is mostly done by plastic tweezers on my workbench. A box of these was purchased at a swap meet many years ago. The bags are labeled “Thumb Forceps” which bespeaks a medical origin. They taper to a point making it easy to maneuver small parts. They are non-conductive and non-magnetic. They have become my fingers for handling SMD parts.
In the photo to the right, the leftmost tweezer is a common stainless steel, the black one to its right is plastic, and the three items to the right are ceramic tipped.
Plastic tweezers do not tolerate heat. For any soldering work I recommend ceramic tipped stainless steel tweezers for even warm components. Solder doesn’t stick to ceramic and they are non-magnetic. The ceramic conducts heat much poorer than steel, therefore they don't cool the work. These tweezers have several sizes and various shapes. The angled sort are good for working in tight areas. The ceramic tipped tweezers are also handy for removing a part when de-soldering it. They don't conduct electricity, either. Mine have bolted-on replaceable tips but I cannot envision ever replacing them.
To keep those small parts from escaping, I use steel cookie pans with surrounding rims as a work area. I attach rubber equipment feet to the bottom to keep the pan from sliding around. I use steel so that I can use magnets (always an attractive option!) on the bottom of my small flat vise, on lightweight lamp fixtures, on soldering iron holders, and such. That way they do not slide around when I’m working but I can easily pull them up and re-position them when desired. The 2 1/4” vise is cast zinc, meant for watch repair (under $10). I cemented 4 small magnets in the four slots, flush with the bottom. A small file cut “V” grooves in the jaw faces to position and hold PC boards securely.
Another sort of vise is the simple handscrew clamp described here. Simple, cheap, and versatile!
Lacking a vise, you can use poster tack putty. You can find it at dollar stores, craft stores, and hardware stores. Just pull off a good sized wad, mash it onto the work surface, and press the circuit board into it. It doesn't leave much (if any) residue and is re-usable. Better than chewing gum.
Larger boards can be secured with blue painter's tape. That, too, leaves little residue and is easily removed.
A couple of X-Acto hobby knives round out the SMD tool kit. These are wonderful for cutting traces, scraping solder mask away from an area, or cleaning a surface of oxide prior to soldering. As you can see elsewhere on this web site, I also use them to prototype circuit boards. The trick to success is to keep the blades sharp. Instead of constantly replacing the blades, keep a sharpening stone on the bench. Every few minutes, a few strokes over the stone will keep it finely honed. Cutting copper and fiberglass quickly dulls any blade. A sharp blade insures accuracy and ease.
Building with SMD components is actually much easier than through-hole parts. No wrapping, no tangles, no wire clippings, and no cleaning out the holes when re-working. The parts are all right there on top of the board where you can see them and probe the connections.
My preferred method is to “tack” the part in place to hold it and then solder it. That is an old welding technique and works well. A touch of solder on one of the target pads provides a start. Nudge the component into place and hold it down with a soldering aid or the tip of steel tweezers on the component body. Apply heat to the junction of the solder-coated pad and the contact of the component. When you see the solder melt and flow onto the contact, remove the heat and maintain tool pressure until the solder solidifies. Now you are free to hold both solder and iron while soldering the remaining joints. Finally, return to the first connection and properly solder it, too. The joints should have visible fillets, that curve of solder filling the edge of the components to the board, insuring the best electrical and mechanical bond.
Removing a part is just a matter of heating the solder to melt it and lifting the part off of the board (This is where the ceramic tipped tweezers really shine!). A hint of rosin flux on each joint is suggested to avoid oxidation. Keep in mind that a properly completed joint should have all rosin either burned off or otherwise removed. We need flux to rework those joints so add it before heating. With a hot-air nozzle set to 360 C. (680 F.) you can quickly heat all connections simultaneously. With a single iron you can dance between the connections until they are all hot. Use small desoldering braid to remove excess solder but don’t remove too much before removing the part. Having some solder material to carry the heat from the iron tip throughout the joint is desirable. Remove too much, the dry joint will be difficult to evenly heat.
If you find that you are working with mostly 2-connection parts like resistors, capacitors, and inductors, then soldering tweezers might be handy. These are two soldering pencils hinged together. Position a tip on each end and when the solder melts then pinch and lift the part off. You can also place a part on the board with one hand and hold the solder with the other. To be clear, I don't have one but I have been tempted.
After the part is removed, excess solder should be removed before the new part is placed. Too much solder and the part slides around. A mere touch of flux will assist in re-melting. I use a syringe dispenser, pushing out the smallest amount possible, wipe it across a junction area, and retract it. I then use a sewing pin to pick up some and apply to other junctions. A little goes a long way. Without flux, solder quickly oxidizes and becomes difficult to work, losing its wetting capability, and makes for unreliable joints. Excess flux makes things slippery and smokes up the work area. A single syringe of flux has lasted me over a decade and it is still half full! I do much more soldering than most people, too.
Speaking of flux, if you don’t have a fume extractor at least use a fan to blow the smoke away from you. The stuff is dangerous to breath. Don’t risk it. I use a foot switch to operate the extractor, leaving it plugged in and ready to use with a touch of my foot. Both hands remain free, and I need not avert my gaze, so I only run the noisy things when necessary.
My preferred solder is rosin core eutectic (63/37) 0.010 inch diameter solder. A one pound spool of it will easily last a lifetime. The only problem that I have with it is that it is too small to feel and if I drop it then it is very difficult to find. Otherwise it is perfect. Great control so I get just the right amount on the joint. Under the microscope it is smaller than the area to be soldered, unlike the stuff that I use on through-hole joints. I bought it at the same price that large diameter 1 pound spools sold for so it is incredibly more cost efficient, at least 100X better.
Instead of designing a circuit board for a simple project, drawing it up with a computer program, sending it off to a board house, and then waiting for the shipment, you can cut your own and have the project built in an hour. Yes cut your own.
I use a hacksaw, or better yet, a jeweler’s saw, to cut out a small piece of un-etched printed circuit board stock. I lay out the board with some of the parts, marking it with pencil or scribe to where I need the lands. I’m halfway there at this point. With a sharp hobby knife I draw out the longest cuts first (usually those that cross the entire board) and then the remaining lines. This first cut is just for finalization of the layout and doesn’t cut completely through the copper layer. If everything still looks good then I make another pass along the lines, cutting deep and vertical all the way through the copper. You will see that copper raise up on either side of the cut. Just like a furrow when it’s plowed through a field. The next pass is done with the blade held at a 45 degree angle from vertical. That cut is done parallel to the original line spaced about twice the depth of the copper. That will result in a nice curling “tail” of copper as you pull the knife along. Finally, another 45 degree cut along the other side of the original line, the opposite angle to the previous cut. This will produce a nice notched channel with a good area of substrate at the bottom isolating the two sides. The result is a clean channel separating the copper. Keep the knife blade sharp by periodically passing it over a sharpening stone at about 33 degree angle on each side, maintaining an even edge by repeating the same number of passes, same angles for each pass.
Use a 20 to 30 degree angle of attack while drawing the blade toward you. That helps keep the cut on track and works toward maximum efficiency. Though this sounds unnecessarily tedious, a few boards will give you the experience to make all of this second nature and you will find yourself cutting these channels with little thought. It will go quite quickly. Any botched boards will be quite small. Nothing goes to waste, anyway. Small pieces will be cut up for island construction projects, right?
Inspect and clean out the channels. Use a brass wire brush to clean out the channels and to clean the copper lands. Fine sandpaper works well to clean off the copper surfaces. Then use an ohmeter to check between lands to insure good isolation. A thin coating of solder over the lands will protect from oxidation and provide a good base for the new components.
The best part is that these little SMT projects are unbelievably robust. Considering that the total component costs are just pennies, these projects are priceless (literally!). Make up several small projects like audio amplifiers, mixers, or oscillators. Each iteration suggests improvements. With instant circuit board returns you can make unlimited alterations and refinements. No more waiting weeks for the board to return from the factory (during which time you always think of improvements...too late!). Then, why not make several while you are at it? Stick them in a drawer for later use!
de ND6T